For this QUARTER 1
NOTE: All Photoshop projects should be saved as a JPG with a resolution of 75 dpi unless otherwise noted.
Project 1 - Pop Culture
Create a funny subtitle animal (think cat images from class overview). The finished project should be a 5" x 5" square with at least 24 pt font. Save as Project 1.jpg and then upload into your shared Digital Graphics folder for grading.
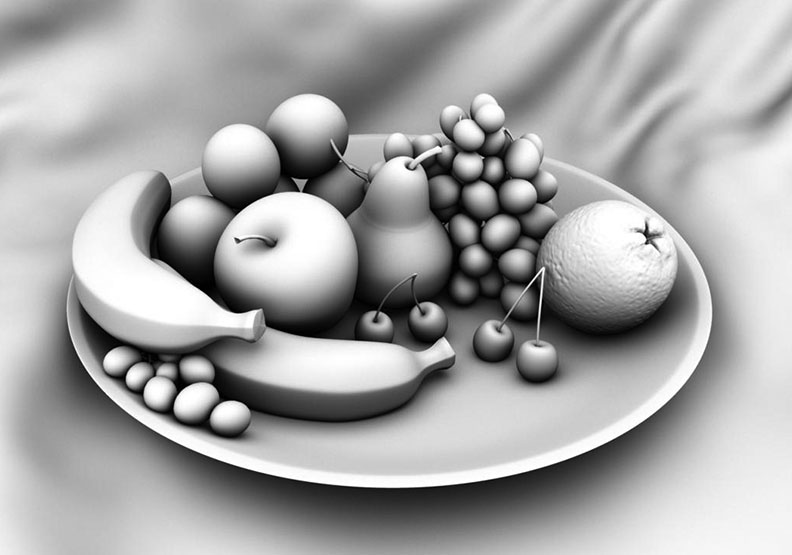
Project 2 - You Are What You Eat
Use a combination of fruit, vegetables, dairy, and meat from the Internet to use as pieces to construct a face. The food items you select should represent the foods that you like to eat. Resize facial parts as needed (nose, ears, mouth, eyes, hair). Use the blue "printers line" from the rule to align the ears and eyes. The finished project should be 5" x 7" (portrait mode). Save as Project 2.jpg and then upload into your shared Digital Graphics folder for grading.
Project 3 - Peek-A-Boo
Have a partner in class take two photos of you with their iPad. The first photo is a mug shot. The second is a mug shot with you covering your face with your hands. You will adjust the opacity of your hands so that your face shows through the hands layer. Save as Project 3.jpg and then upload into your shared Digital Graphics folder for grading.
Project 4 - Art in Photo
Download the Art in Photo app (free) from the iTunes store on your ipad. You will then take a photo of a person and select a filter from within the app. Once completed, share the project with [email protected]
SUMMATIVE PROJECT 1 - Layers and opacity
Your task is to take a photo of yourself with one hand covering your mouth and the other covering an eye and then overlay an animal to cover each of your hands with the animal's eye and mouth. See the examples here, here, and here. Save as Summative 1.jpg and then upload into your shared Digital Graphics folder for grading.
Project 5 - Colorize
Open this image with Photoshop and convert it from Grayscale to RBG (Image, Mode, RGB). Adjust the contrast (Image, Adjustments, Auto Contrast), and then change your brush to "color" rather than "normal." Be sure to lower the opacity of your brush to between 30-60%. You must use realistic colors for the image you choose to colorize. It is recommended that you visit TIP SITE before beginning your project. Save as Project 5.jpg and then upload into your shared Digital Graphics folder for grading.
Project 6 - Pattern Fill
Using a combination of both patterns and gradient fills, color one of the images listed below. Make sure to use variety and have fun! Be sure to Think funky or realistic. Select one of these files: Fish Duck Butterfly Sledding Save as Project 6.jpg and then upload into your shared Digital Graphics folder for grading.
SUMMATIVE PROJECT 2 - Color & Patterns
Create the front side of a holiday greeting card in which you create a pattern relating to the holiday and then insert text and a related image for the front of your greeting card. The card should measure 4" wide x 6" high. Insert a framed border around your greeting card with is 1/2" inch wide and color it with these values: R=100, G=150, G=200. The text used for your greeting card should be R=256, G=100, G=200.Details to follow soon. Save as Summative 2.jpg and then upload into your shared Digital Graphics folder for grading.
Project 7 - Name Typography
Create a new image that is 7" wide and 4" tall. Using a large san serif type font such as Arial Black (such as 75 pt.) to spell your FIRST or LAST NAME and then select Edit, Transform and resize your name to fill most of the canvas. Next open up as many photos as necessary to fill the number of letters in your name. The photos you select should represent your personality and hobbies (HINT: Select, All, Edit, Copy and then use the magic wand to select a letter on your type layer ... Edit, Paste Special, Paste Into, and then move and resize the image as needed). Challenge: try to add a stroke to your text with blending options for a more defined outline to your words! Save as Project 7.jpg and then upload into your shared Digital Graphics folder for grading.
Project 8 - Bevel & Emboss, Countour, Satin Typography 2
Create a new file that is 7" wide x 3" deep, and a resolution of 72 dpi with a black background. YOu will be creating text that is a light pastel color containing your last name (Use all caps and a serif font). Right click on the text layer and select blending options, Bevel and Emboss, Contour. Save as Project 8.jpg and then upload into your shared Digital Graphics folder for grading.
SUMMATIVE PROJECT 3 - Text
For this project, you will need to select a state or country. Your completed project should measure 5" x 7" (or 7" x 5") with a resolution of 100 DPI. Download a map representing that state and insert it as the background for the project. Use a san serif font and type the name of the state in all capital letters. Size the text so that it fills most of the image space. You will then fill each letter with an image that represents something from that state. (For example, if you selected Maine, you may use an image of a lobster, a light house, etc.). Each letter should then have a different blending option. Once completed, flatten your image and save as Summative 3.jpg and then upload into your shared Digital Graphics folder for grading.
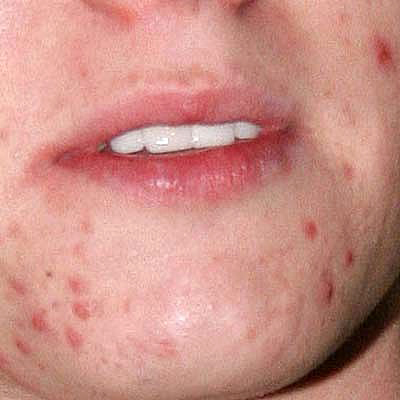
Project 9 - Removing Blemishes
Save this file and use the healing tool to remove the blemishes from ONE side of the person's face. You will find using the "healing brush" to be the easiest method for this project. Choose from project 21a or 21b. Save as Project 9.jpg and then upload into your shared Digital Graphics folder for grading.
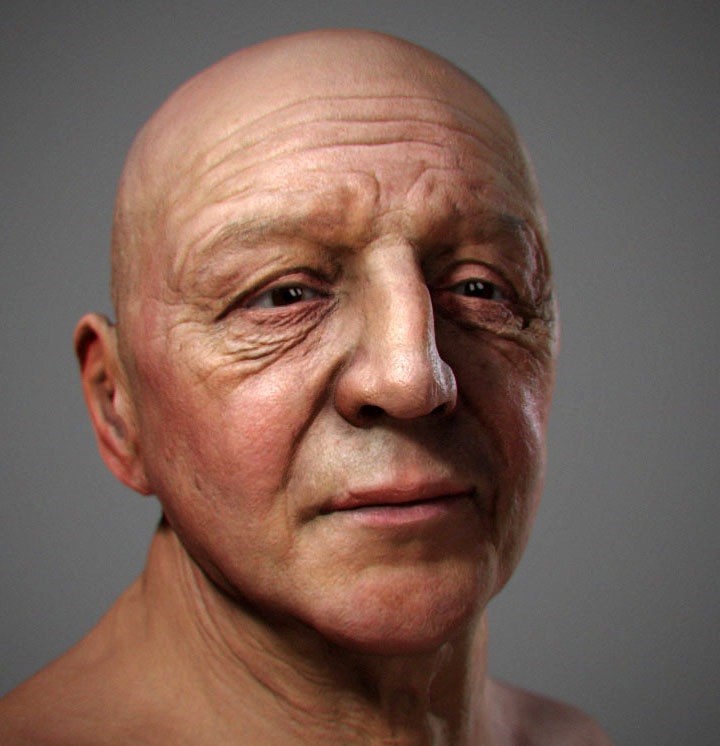
Project 10 - Removing Wrinkles
Save this file and remove the wrinkles from ONE side of the person's face. You will find using the "healing brush" and "clone brush" to be the easiest method for this project. Save as Project 10.jpg and then upload into your shared Digital Graphics folder for grading.
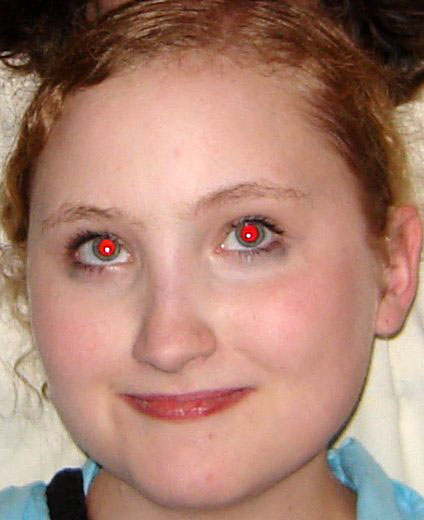
Project 11 - Removing Red Eye
Save this file and use the "Red Eye Healing Tool" to remove the red from the girl's eyes. Use the red eye healing tool found in Photoshop to remove the red from the girls eyes. Save as Project 11.jpg and then upload into your shared Digital Graphics folder for grading.
Project 12 - Changing Eye Color
Use this photo to change the woman's eye color in ONE of her eyes. Use the printers blue line from the ruler and then using the elliptical marque tool to select the eye will give you the most precision. Next use a brush and select a new eye color. Change the brush mode to "color" rather than normal. You may want to practice a bit with opacity to make it look realistic. Save as Project 12.jpg and then upload into your shared Digital Graphics folder for grading.
Project 13 - Dazzling Smile
Take a close up selfie of your smile revealing your teeth. Email the image to yourself and then open it with Photoshop. Use the magic wand and/or selection tool and lasso to select only your the upper and lower teeth from half of your smile. Adjust, color balance, and increase the amount of cyan to approximately 50 - 65% and blue used to be between 10 - 15%. Next adjust the brightness and contrast to brighten the smile. Save as Project 13.jpg and then upload into your shared Digital Graphics folder for grading.
SUMMATIVE PROJECT 4 - Layers, Healing, Transforming, Opacity
You will need to take a face picture of seven other classmates with your iPad in addition to your own photo. You will use your own face shape and eyebrows as the base and will replace your mouth, nose, each eye, each ear, and hair with those from other classmates. Left eye = student 1; Right eye = student 2; Left ear = student 3; Right ear = student 4; Nose = student 5; Mouth = student 6; Hair = student 7. Use the clone stamp and healing brush to blend in the items you place onto your own face so that they appear to be as natural as possible. Once the faces are merged and sized proportionally you will need to flatten the image and perhaps blend obvious edges from each segment with the healing brush. The finished project should be 5" x 7". Save as Summative 4.jpg and then upload into your shared Digital Graphics folder for grading.
Project 14 - Shadows
Mr. Hunter will take a full-length body shot of you standing in front of a blank wall for this project. Use this tutorial to create a realistic looking shadow in your image. Save as Project 14.jpg and then upload into your shared Digital Graphics folder for grading.
Project 15 - Level Horizon
Use this image for this project. You will use the Ruler Tool and then select Image, Image Rotation, Arbitrary. Finally, use the Cropping Tool to remove any "checkerboard" appearing on the top, bottom, left and right margins. Save as Project 15.jpg and then upload into your shared Digital Graphics folder for grading.
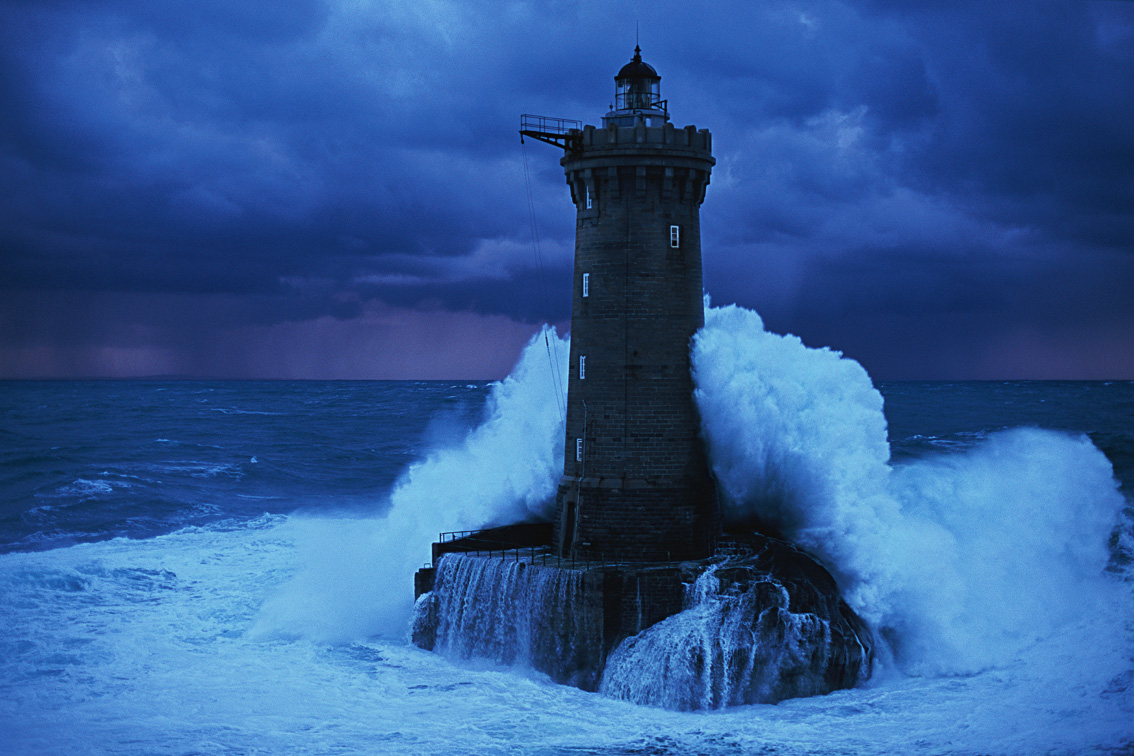
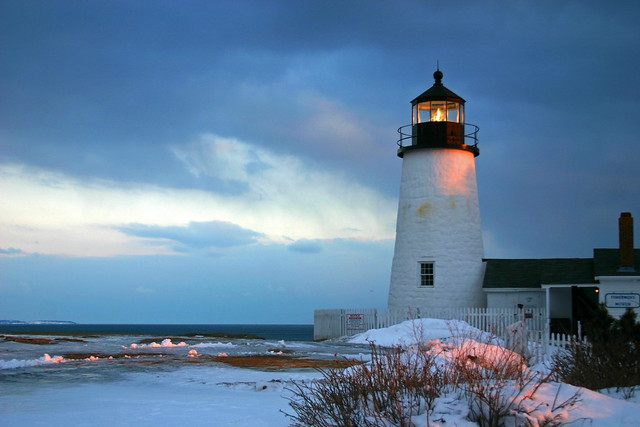
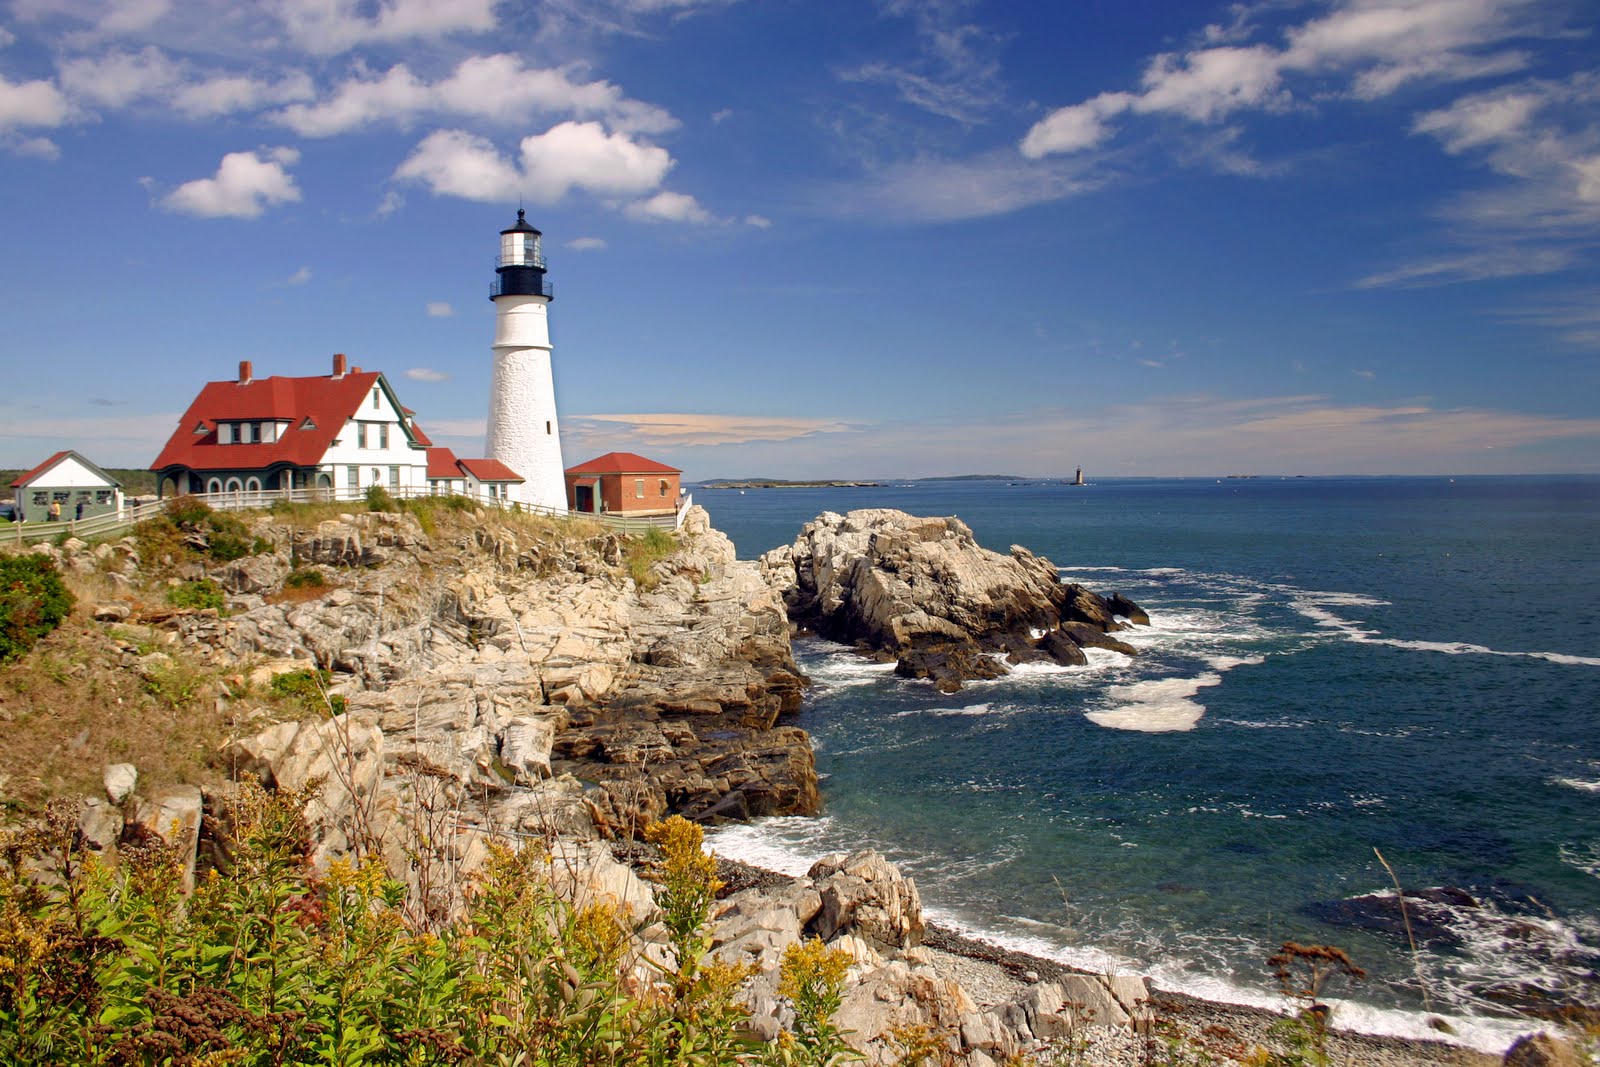
Project 16 - Lighthouse
Select one of these lighthouses (lighthouse 1, lighthouse 2, or lighthouse 3) and adjust the brightness, contrast, and light settings so that it appears that the picture was taken at night. Add a lens flare so that it appears that the light is beaming from the lighthouse. The finished project should be approximately 5" x 7" (portrait or landscape mode). Save as Project 16.jpg and then upload into your shared Digital Graphics folder for grading.
Summative Project 5 - Photograph adjustment
Select an object, such as a bottle of juice, and slice it in half. Be sure that your canvas size has been set both wide and deep enough to allow you adequate space to place the portion that you have cut back onto the canvas. Use edit, paste, transform, and rotate the pasted portion so that it is tipped at an angle for the fruit to be eventually placed. Select a fruit or some other liquid item and paste it onto the first portion of your image. Edit, Transform, Distort and adjust its size and width to fit onto the open end of the image. Repeat for the second image. Layer, Flatten. Adjust the image size so that your finished project is 7" x 7" and save as Summative 5.jpg and then email to [email protected].
NOTE: All Photoshop projects should be saved as a JPG with a resolution of 75 dpi unless otherwise noted.
Project 1 - Pop Culture
Create a funny subtitle animal (think cat images from class overview). The finished project should be a 5" x 5" square with at least 24 pt font. Save as Project 1.jpg and then upload into your shared Digital Graphics folder for grading.
Project 2 - You Are What You Eat
Use a combination of fruit, vegetables, dairy, and meat from the Internet to use as pieces to construct a face. The food items you select should represent the foods that you like to eat. Resize facial parts as needed (nose, ears, mouth, eyes, hair). Use the blue "printers line" from the rule to align the ears and eyes. The finished project should be 5" x 7" (portrait mode). Save as Project 2.jpg and then upload into your shared Digital Graphics folder for grading.
Project 3 - Peek-A-Boo
Have a partner in class take two photos of you with their iPad. The first photo is a mug shot. The second is a mug shot with you covering your face with your hands. You will adjust the opacity of your hands so that your face shows through the hands layer. Save as Project 3.jpg and then upload into your shared Digital Graphics folder for grading.
Project 4 - Art in Photo
Download the Art in Photo app (free) from the iTunes store on your ipad. You will then take a photo of a person and select a filter from within the app. Once completed, share the project with [email protected]
SUMMATIVE PROJECT 1 - Layers and opacity
Your task is to take a photo of yourself with one hand covering your mouth and the other covering an eye and then overlay an animal to cover each of your hands with the animal's eye and mouth. See the examples here, here, and here. Save as Summative 1.jpg and then upload into your shared Digital Graphics folder for grading.
Project 5 - Colorize
Open this image with Photoshop and convert it from Grayscale to RBG (Image, Mode, RGB). Adjust the contrast (Image, Adjustments, Auto Contrast), and then change your brush to "color" rather than "normal." Be sure to lower the opacity of your brush to between 30-60%. You must use realistic colors for the image you choose to colorize. It is recommended that you visit TIP SITE before beginning your project. Save as Project 5.jpg and then upload into your shared Digital Graphics folder for grading.
Project 6 - Pattern Fill
Using a combination of both patterns and gradient fills, color one of the images listed below. Make sure to use variety and have fun! Be sure to Think funky or realistic. Select one of these files: Fish Duck Butterfly Sledding Save as Project 6.jpg and then upload into your shared Digital Graphics folder for grading.
SUMMATIVE PROJECT 2 - Color & Patterns
Create the front side of a holiday greeting card in which you create a pattern relating to the holiday and then insert text and a related image for the front of your greeting card. The card should measure 4" wide x 6" high. Insert a framed border around your greeting card with is 1/2" inch wide and color it with these values: R=100, G=150, G=200. The text used for your greeting card should be R=256, G=100, G=200.Details to follow soon. Save as Summative 2.jpg and then upload into your shared Digital Graphics folder for grading.
Project 7 - Name Typography
Create a new image that is 7" wide and 4" tall. Using a large san serif type font such as Arial Black (such as 75 pt.) to spell your FIRST or LAST NAME and then select Edit, Transform and resize your name to fill most of the canvas. Next open up as many photos as necessary to fill the number of letters in your name. The photos you select should represent your personality and hobbies (HINT: Select, All, Edit, Copy and then use the magic wand to select a letter on your type layer ... Edit, Paste Special, Paste Into, and then move and resize the image as needed). Challenge: try to add a stroke to your text with blending options for a more defined outline to your words! Save as Project 7.jpg and then upload into your shared Digital Graphics folder for grading.
Project 8 - Bevel & Emboss, Countour, Satin Typography 2
Create a new file that is 7" wide x 3" deep, and a resolution of 72 dpi with a black background. YOu will be creating text that is a light pastel color containing your last name (Use all caps and a serif font). Right click on the text layer and select blending options, Bevel and Emboss, Contour. Save as Project 8.jpg and then upload into your shared Digital Graphics folder for grading.
SUMMATIVE PROJECT 3 - Text
For this project, you will need to select a state or country. Your completed project should measure 5" x 7" (or 7" x 5") with a resolution of 100 DPI. Download a map representing that state and insert it as the background for the project. Use a san serif font and type the name of the state in all capital letters. Size the text so that it fills most of the image space. You will then fill each letter with an image that represents something from that state. (For example, if you selected Maine, you may use an image of a lobster, a light house, etc.). Each letter should then have a different blending option. Once completed, flatten your image and save as Summative 3.jpg and then upload into your shared Digital Graphics folder for grading.
Project 9 - Removing Blemishes
Save this file and use the healing tool to remove the blemishes from ONE side of the person's face. You will find using the "healing brush" to be the easiest method for this project. Choose from project 21a or 21b. Save as Project 9.jpg and then upload into your shared Digital Graphics folder for grading.
Project 10 - Removing Wrinkles
Save this file and remove the wrinkles from ONE side of the person's face. You will find using the "healing brush" and "clone brush" to be the easiest method for this project. Save as Project 10.jpg and then upload into your shared Digital Graphics folder for grading.
Project 11 - Removing Red Eye
Save this file and use the "Red Eye Healing Tool" to remove the red from the girl's eyes. Use the red eye healing tool found in Photoshop to remove the red from the girls eyes. Save as Project 11.jpg and then upload into your shared Digital Graphics folder for grading.
Project 12 - Changing Eye Color
Use this photo to change the woman's eye color in ONE of her eyes. Use the printers blue line from the ruler and then using the elliptical marque tool to select the eye will give you the most precision. Next use a brush and select a new eye color. Change the brush mode to "color" rather than normal. You may want to practice a bit with opacity to make it look realistic. Save as Project 12.jpg and then upload into your shared Digital Graphics folder for grading.
Project 13 - Dazzling Smile
Take a close up selfie of your smile revealing your teeth. Email the image to yourself and then open it with Photoshop. Use the magic wand and/or selection tool and lasso to select only your the upper and lower teeth from half of your smile. Adjust, color balance, and increase the amount of cyan to approximately 50 - 65% and blue used to be between 10 - 15%. Next adjust the brightness and contrast to brighten the smile. Save as Project 13.jpg and then upload into your shared Digital Graphics folder for grading.
SUMMATIVE PROJECT 4 - Layers, Healing, Transforming, Opacity
You will need to take a face picture of seven other classmates with your iPad in addition to your own photo. You will use your own face shape and eyebrows as the base and will replace your mouth, nose, each eye, each ear, and hair with those from other classmates. Left eye = student 1; Right eye = student 2; Left ear = student 3; Right ear = student 4; Nose = student 5; Mouth = student 6; Hair = student 7. Use the clone stamp and healing brush to blend in the items you place onto your own face so that they appear to be as natural as possible. Once the faces are merged and sized proportionally you will need to flatten the image and perhaps blend obvious edges from each segment with the healing brush. The finished project should be 5" x 7". Save as Summative 4.jpg and then upload into your shared Digital Graphics folder for grading.
Project 14 - Shadows
Mr. Hunter will take a full-length body shot of you standing in front of a blank wall for this project. Use this tutorial to create a realistic looking shadow in your image. Save as Project 14.jpg and then upload into your shared Digital Graphics folder for grading.
Project 15 - Level Horizon
Use this image for this project. You will use the Ruler Tool and then select Image, Image Rotation, Arbitrary. Finally, use the Cropping Tool to remove any "checkerboard" appearing on the top, bottom, left and right margins. Save as Project 15.jpg and then upload into your shared Digital Graphics folder for grading.
Project 16 - Lighthouse
Select one of these lighthouses (lighthouse 1, lighthouse 2, or lighthouse 3) and adjust the brightness, contrast, and light settings so that it appears that the picture was taken at night. Add a lens flare so that it appears that the light is beaming from the lighthouse. The finished project should be approximately 5" x 7" (portrait or landscape mode). Save as Project 16.jpg and then upload into your shared Digital Graphics folder for grading.
Summative Project 5 - Photograph adjustment
Select an object, such as a bottle of juice, and slice it in half. Be sure that your canvas size has been set both wide and deep enough to allow you adequate space to place the portion that you have cut back onto the canvas. Use edit, paste, transform, and rotate the pasted portion so that it is tipped at an angle for the fruit to be eventually placed. Select a fruit or some other liquid item and paste it onto the first portion of your image. Edit, Transform, Distort and adjust its size and width to fit onto the open end of the image. Repeat for the second image. Layer, Flatten. Adjust the image size so that your finished project is 7" x 7" and save as Summative 5.jpg and then email to [email protected].
